Host Your Own Blog Portfolio Site With Hugo And Github Pages
We are going to go through the full process of making a new Hugo site, adding a theme and having GitHub actions build and deploy that site to your custom domain using GitHub pages.
What is Hugo?
An Open-Source Static site generator written in Go that allows you to write markdown and have it turned into generated HTML.
Hugo allows you to write your own themes from scratch or you can use some of the open source themes others have created which is what we will do today.
What is GitHub pages?
Allows you to host websites for your open source projects and your account. There are some rules around GitHub pages, you can’t host personal stores or business pages here for free but you can easily host your own blogs/portfolios and pages for your open source software.
What is GitHub actions?
GitHub actions allow you to build your software in the cloud on agents run by GitHub. This makes it easy and repeatable for you to build your software.
Let’s Build!
Create and clone a new repo
Create a new Repo in GitHub, to be able to host your pages for free this needs to be a public repository. You can name this repository however you like, I prefer to name it the same as the URL I intend to host it on. We will add a README file now as well.
 Creating the new GitHub Repository
Install Hugo
The full instructions for installing Hugo can be found on the official documentation. The easiest way is Homebrew on Mac and Chocolatey on Windows.
Create new site
Clone down the repository and open up a terminal inside that directory.
Run the command hugo new site . --force this will create a new Hugo site inside that directory and the --force is because this is not an empty repo due to our README and .git folder.
Once you have done this you can go ahead and open this directory up in your editor of choice and you can run hugo serve -D in that same terminal window and Hugo should give you a blank webpage for us to start working on.
Install theme
Now that we have a running Hugo site we can see it’s a bit bland, in fact, it’s blank. To fix this we will add a theme, I have chosen to use the LoveIt theme.
To add a theme you can find themes on Hugo’s site or places like Jamstack once you find a theme you like you can follow the instructions on their website or GitHub to set up and customize that specific theme.
The process for adding it to Hugo is always the same, we will go back to the terminal from before and run.
git submodule add https://github.com/dillonzq/LoveIt.git themes/LoveIt
This will add the LoveIt theme as a submodule and add it to the themes/ directory in Hugo which is where all themes must be stored.
There is one final step to tell Hugo to use your theme and that is to edit the config.toml file and add the line theme = "" with the name of the theme. However, since we are using the LoveIt theme they have posted a full config.toml here which we can just replace our local config file with. This will have all the inclusions for the features of this theme as well as the theme line that we need.
Once you have replaced your local config file you can now run hugo serve -D once more and should see a page just like this.

Add new post
We now have a running Hugo site with a theme applied! but it’s looking pretty empty in here let’s add a few posts.
Since we have hugo serve -D running in our terminal Hugo will constantly watch the directory and rebuild whenever changes are made, this will let us create our posts without having to rebuild our project each time.
To add our new posts create a new terminal window so that we can keep hugo serve running and run the command.
hugo new posts/my-first-post.md
This will create a new post inside the folder posts/ as Hugo builds its site off the structure of the directory.
And just like that, we have a new post on our site!

Hugo Post Frontmatter
Now we have a new post let’s take a quick look at Hugo’s ’ frontmatter’. The front matter is that part at the top of the my-first-post.md file, Themes support different fields in here and they can be used to overwrite settings from the config file.
The only part we need to worry about right now is the draft status, while we are running hugo serve -D locally it will automatically build but more importantly the -D tells hugo to render the draft posts, when we build later we won’t be using that flag so we need to set this post’s draft status to false.
You can change the title and add some quick content to this post if you like then move on to the next step.
Push to repo
Since we are going to be using a custom domain we need to set the baseURL in our config file to be our custom domain. Update your config file to match your custom domain with a trailing slash.

We can now push all of our changes up to GitHub!
Setup GitHub pages
Once our changes are received by GitHub we can begin the process of setting up the GitHub Pages portion.
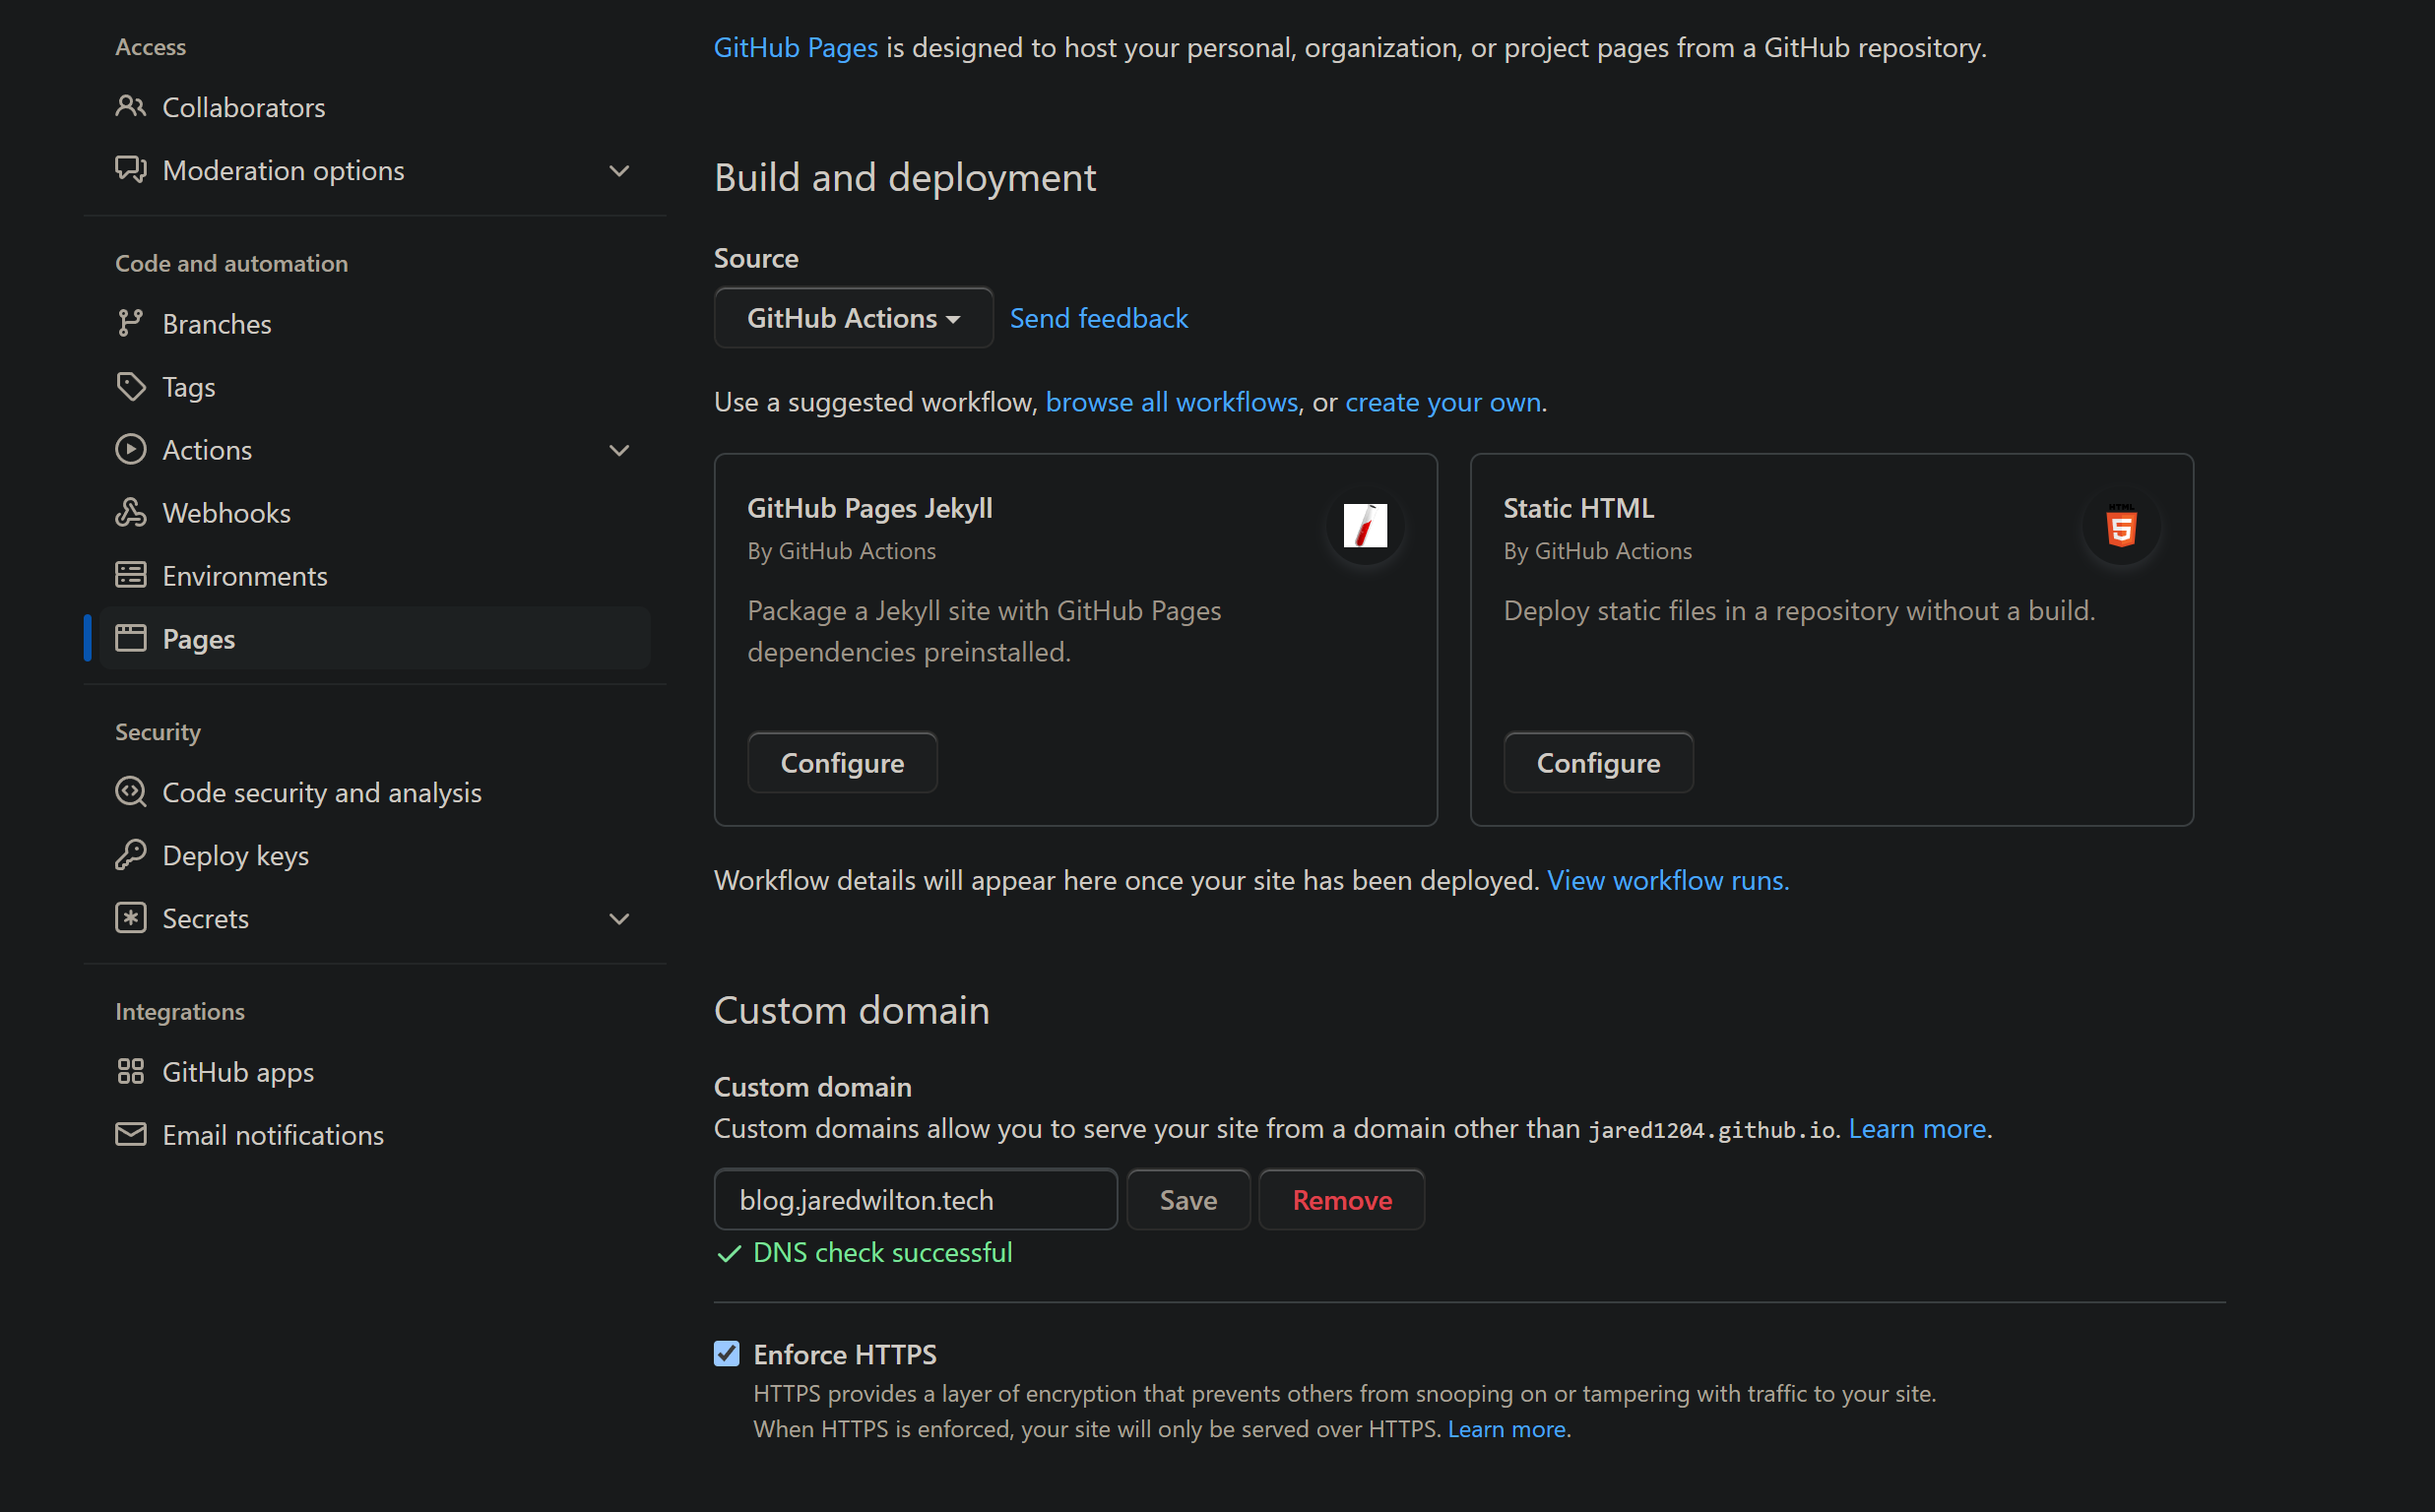
First up we will navigate to the repository settings under ‘Pages’ Change the source to the new ‘GitHub Actions’ setting
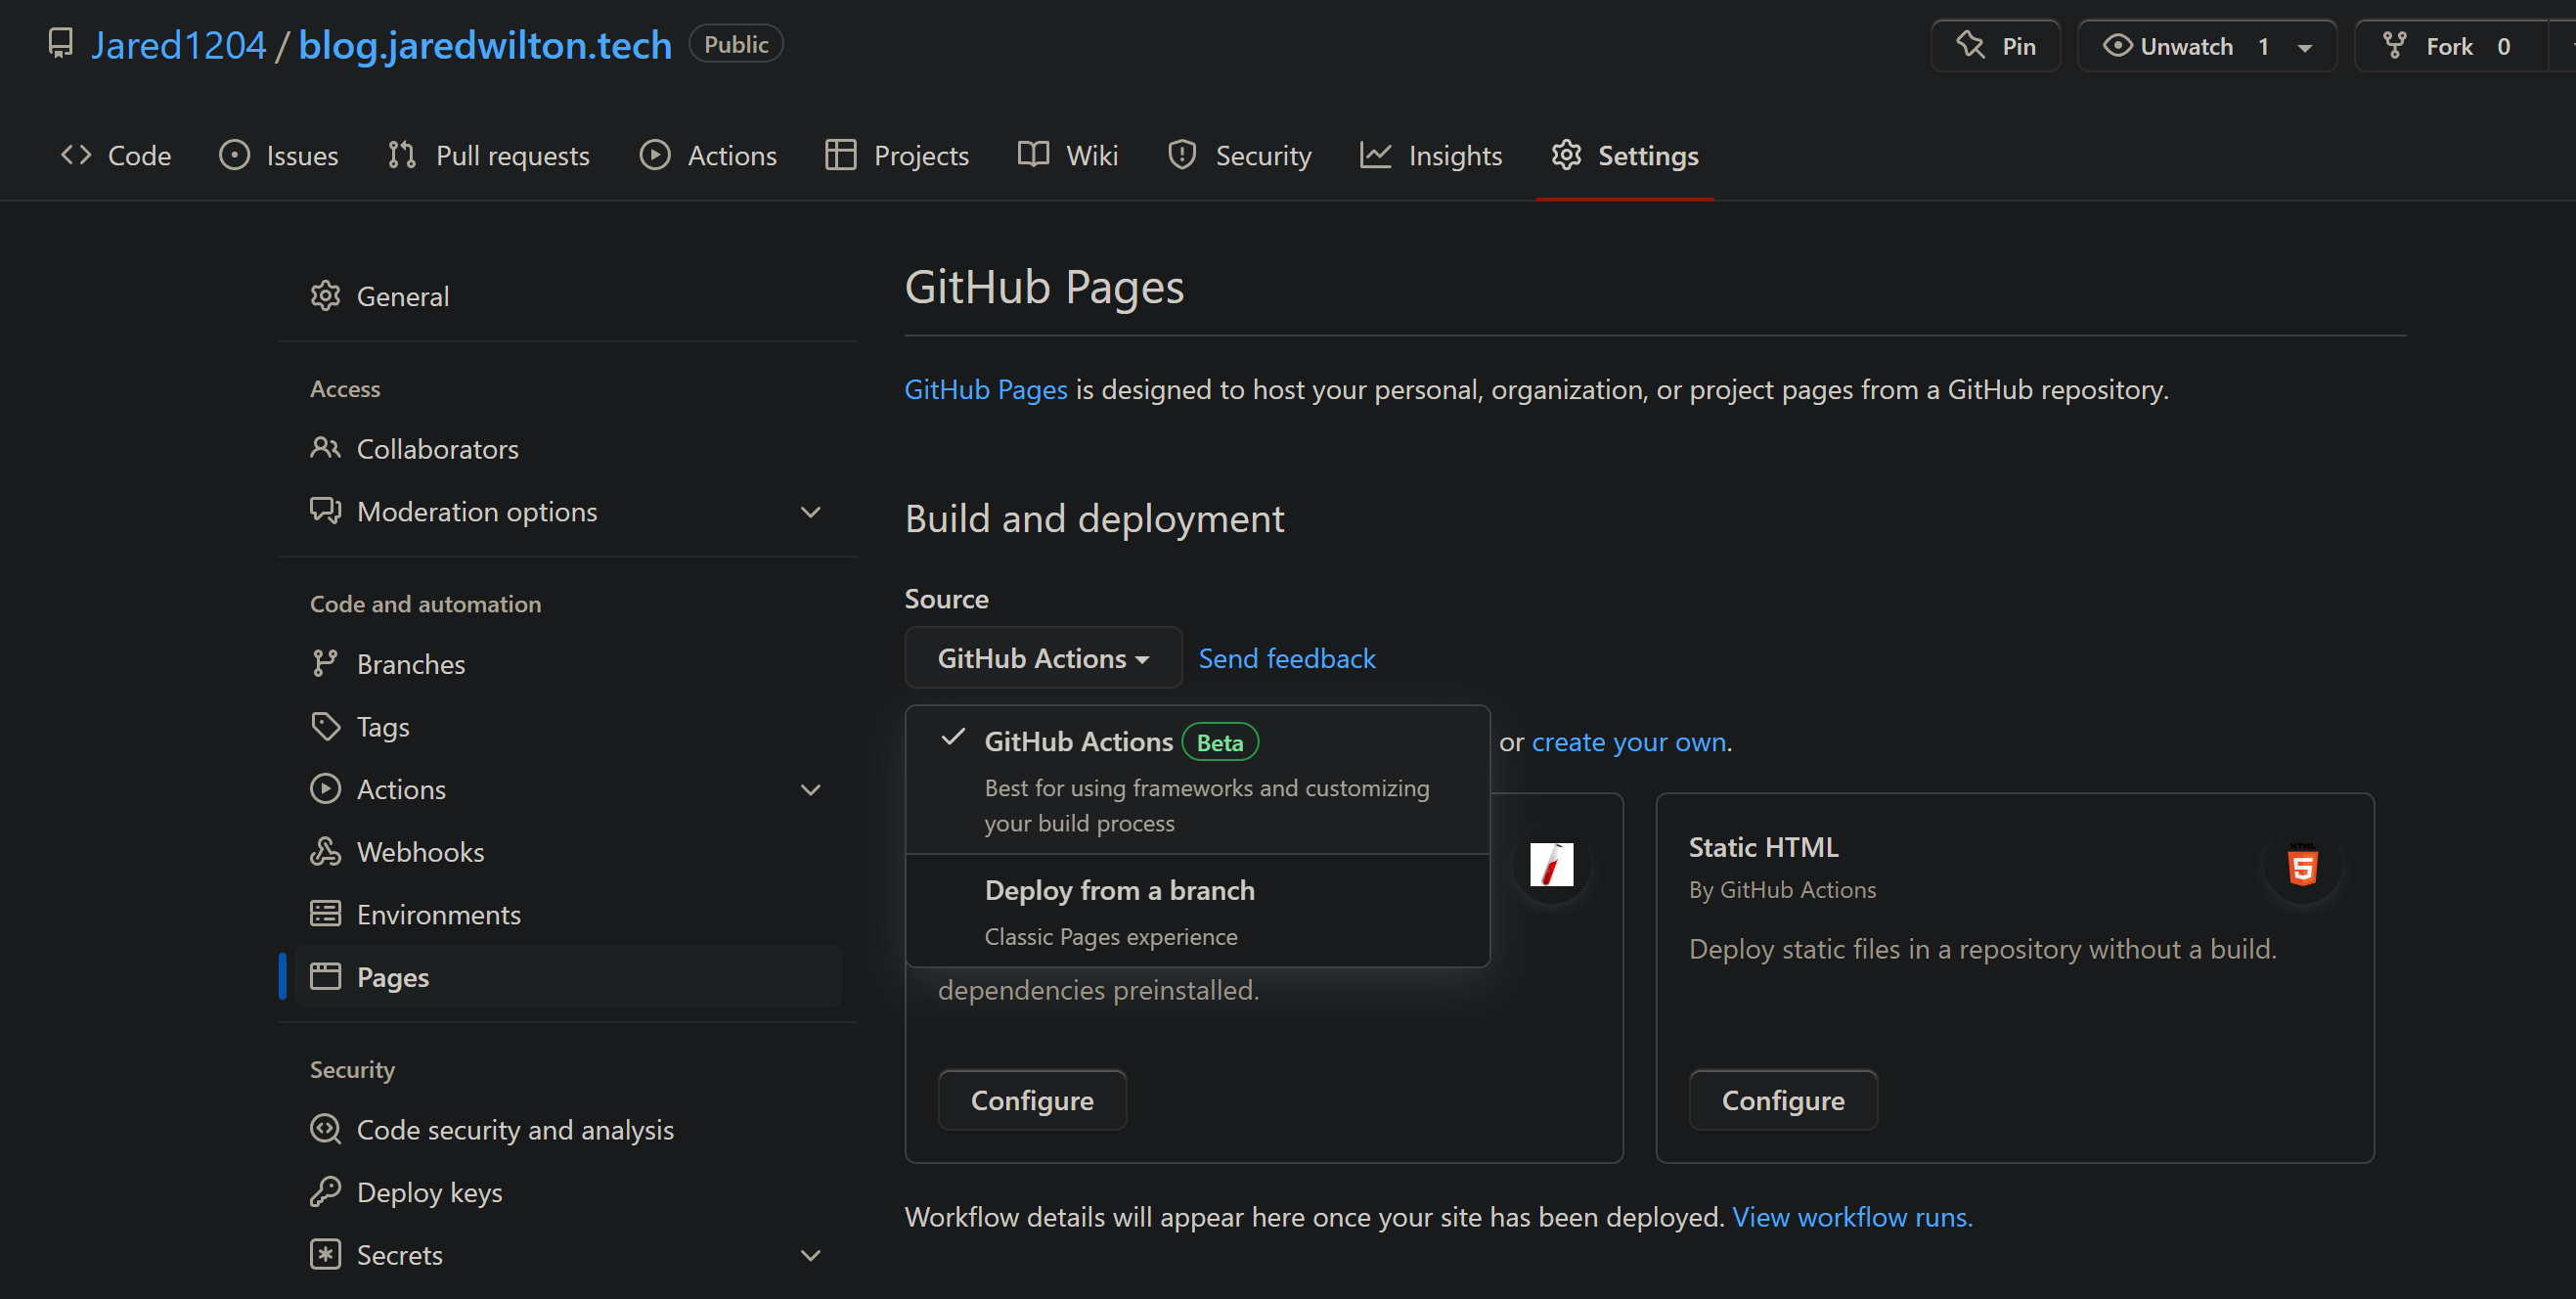
GitHub should suggest Hugo as a recommended Action, if it doesn’t click browse all and find Hugo and hit configure.
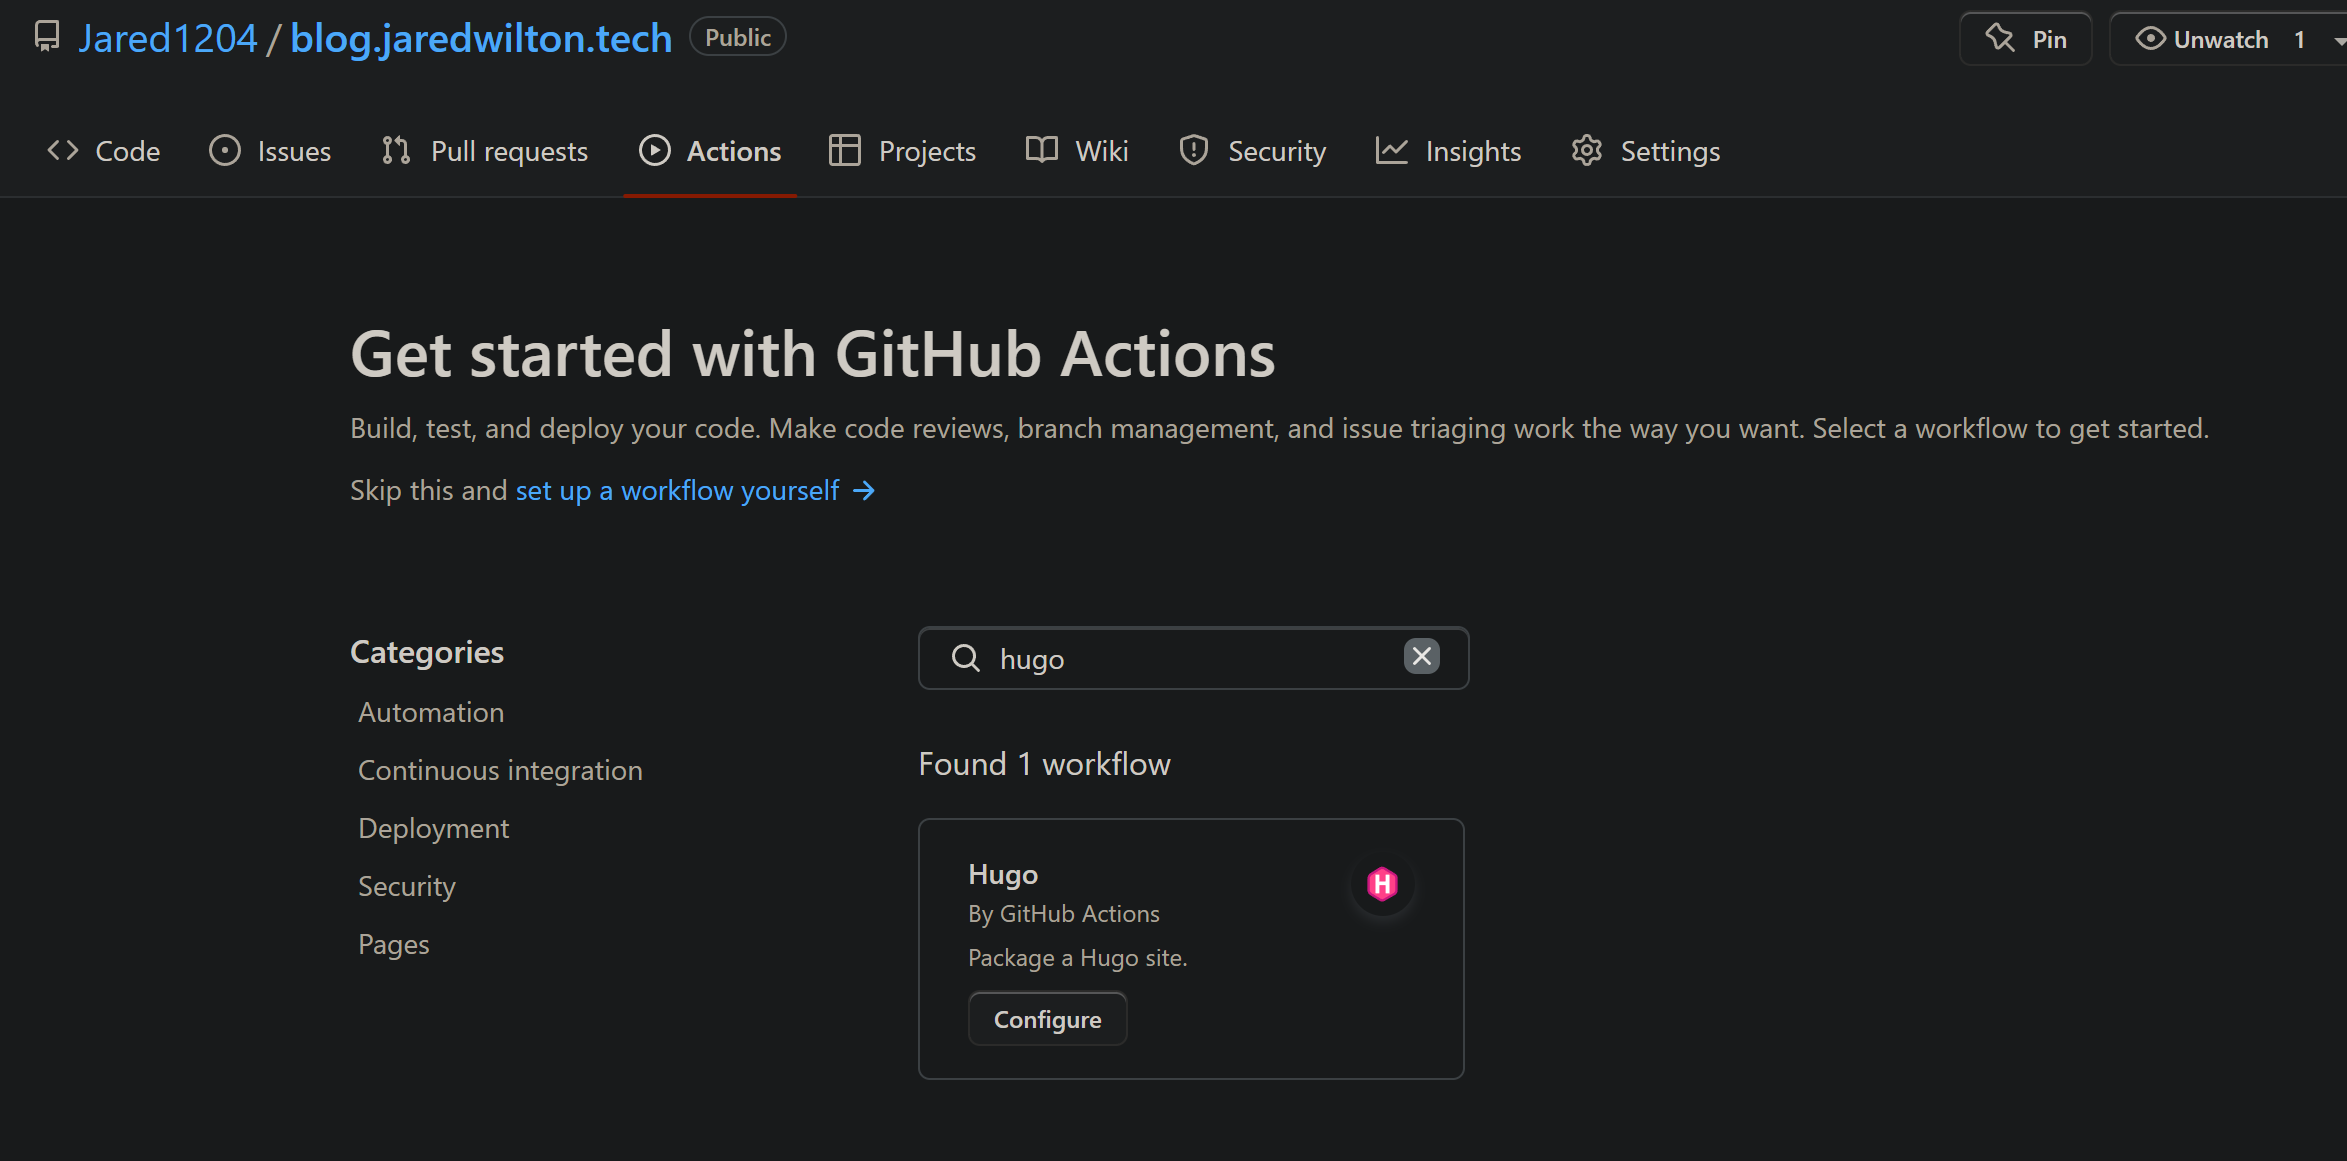
We don’t need to make any change to this file so just go ahead and commit it

If you navigate to Actions now you will see that a new action has triggered off which will build your Hugo site and push it to the GitHub Pages environment. You will be able to navigate to this site by going back to settings -> pages and finding your URL there.

Since we built the repo name to be the same as the custom domain we plan on using and the same as the baseUrl we set in our config this site should all work as expected as the navigation will be based on your custom domain, Until we setup the custom domain you can find your site hosted on this URL structurehttps://{yourGitHubName}.github.io/{repoName}
If these are not all the same you might see your site acting weird as the baseUrl is not the same as the repo, this is fine and won’t affect us once we are on a custom domain as long as the custom domain is correct to the baseUrl that was set in the config.
Setup custom domain
Now that we have our site running on the github.io domain we can go ahead and set up our custom domain. I use Namecheap as my domain provider, you can use any service you like but your DNS setup might be slightly different.
Navigate to your domain provider and find the DNS settings for your domain
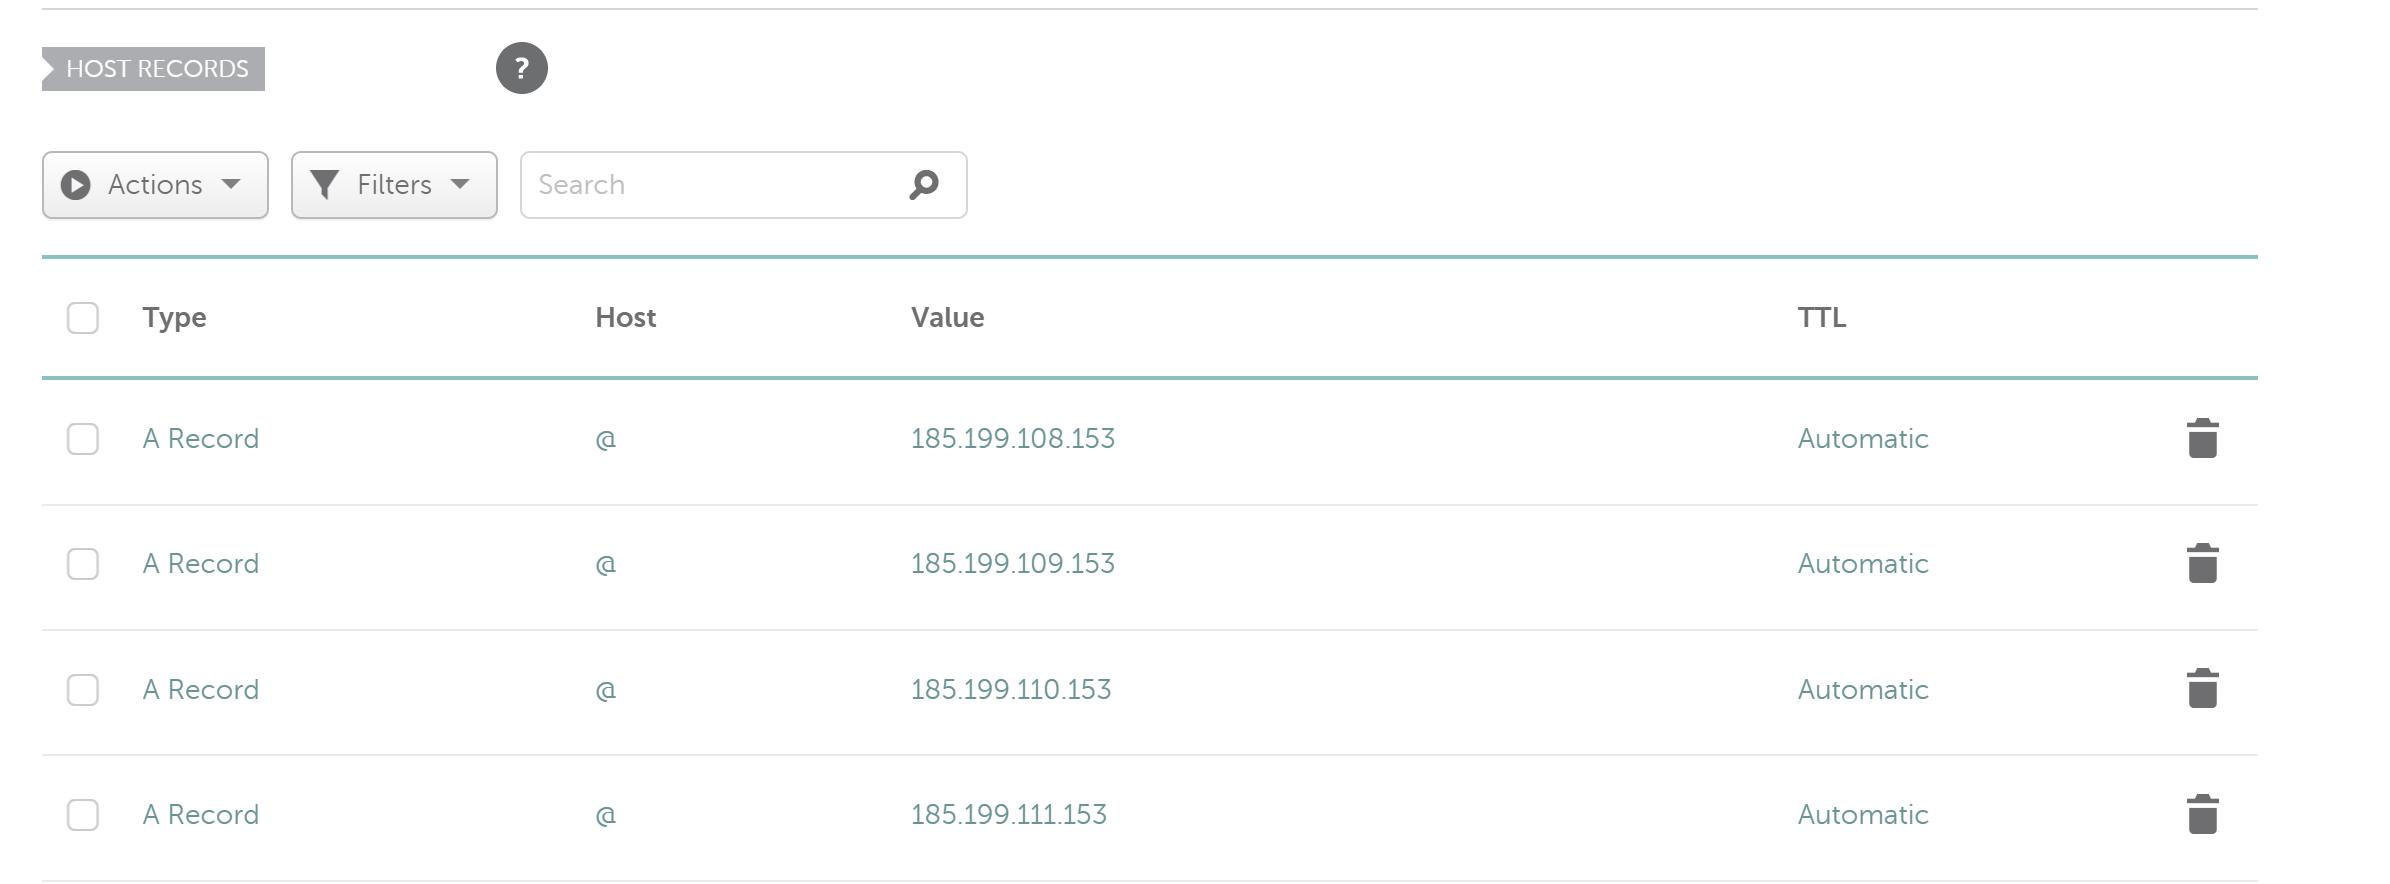
The first thing we need to do is add the Github Pages IP addresses, these can be found in their documentation and should be added like this.
Now we can add our CNAME records to our Github pages repository, here you can do your custom domain or any subdomains if you wish, as you can see I have a couple here one for my domain and one for this post using a subdomain.
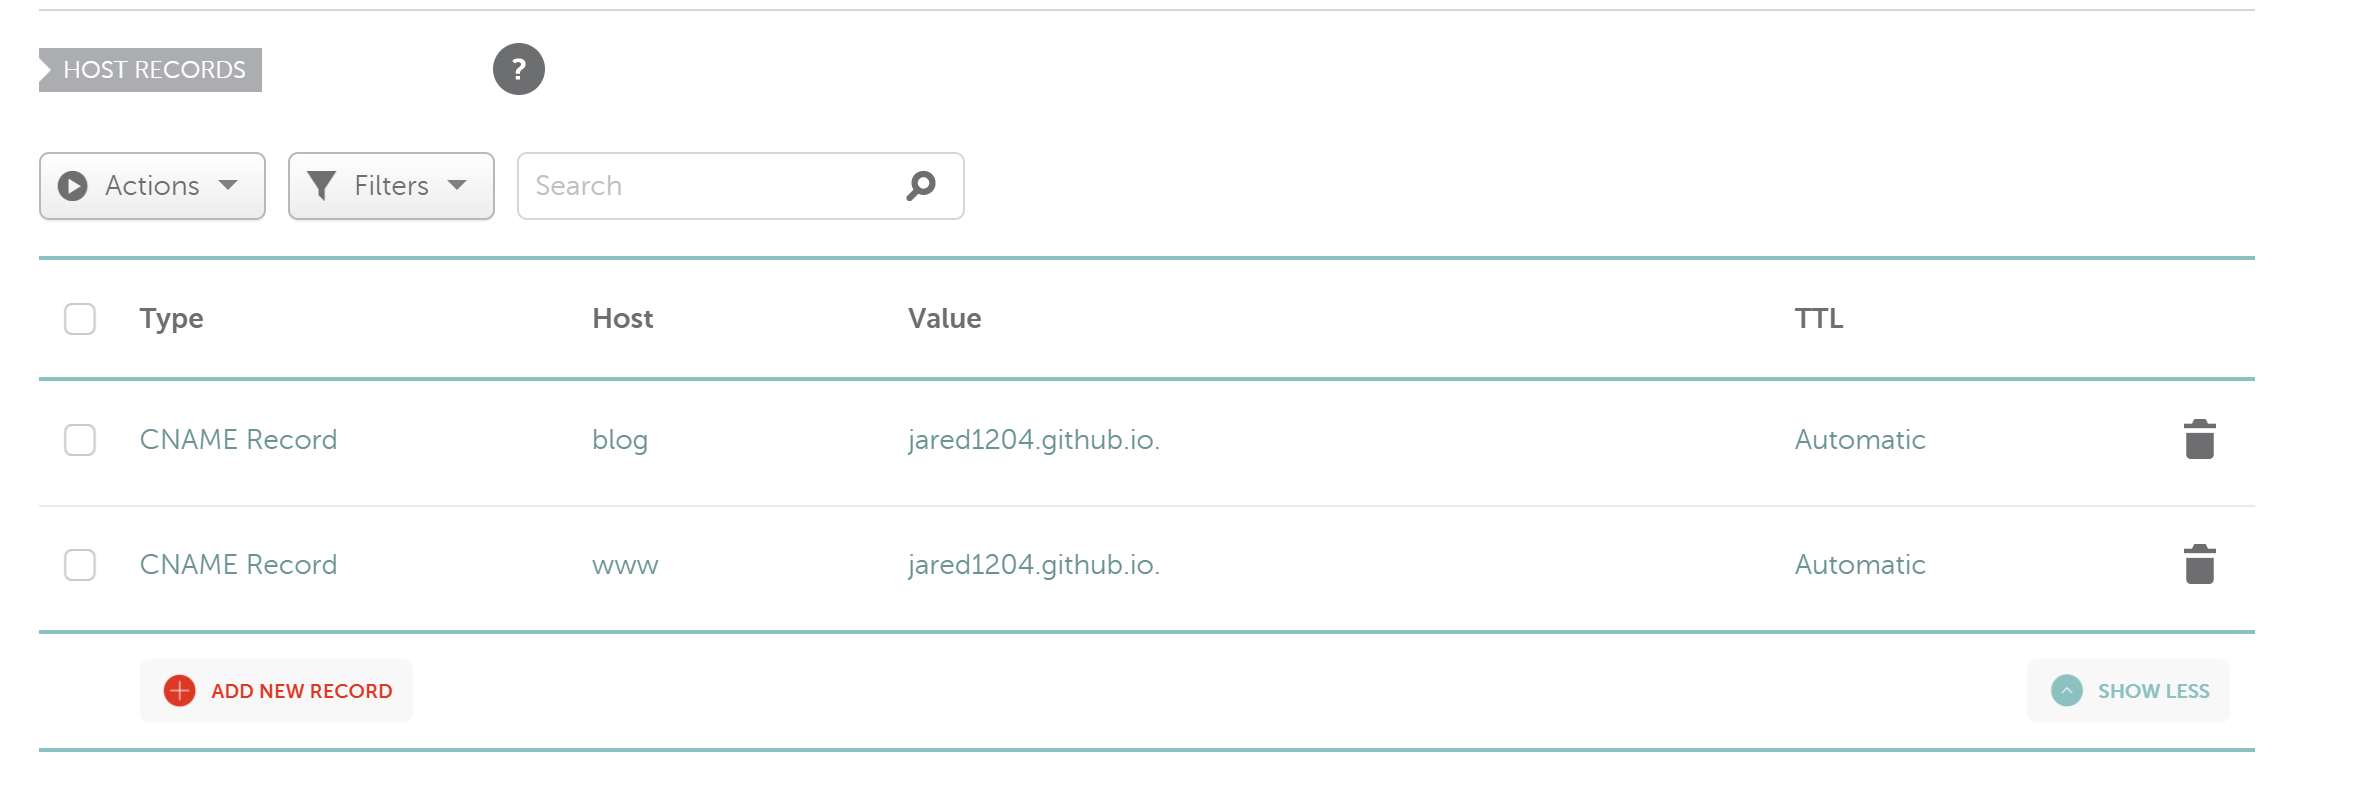
By adding ‘blog’ to the host I have created a subdomain of blog.jaredwilton.tech and ‘www’ will allow me to use jaredwilton.tech as my domain.
Once you have given some time to let the DNS fully propagate you can go back to GitHub page settings and add in your custom domain. GitHub will verify that the domain is pointed to your pages and if all is good you will be able to tick the ‘Enforce HTTPS’ box and GitHub will re-run your action pushing your site up to your new domain.
Verify your Custom Domain for your GitHub account
GitHub recommends that you verify your domain, this is super simple and just involves adding a DNS TXT record. This will ensure that only repositories owned by your account can use GitHub pages with your domain or any subdomains.
You can find the full steps on how to do this on the official documentation.
This is how the setup of this GitHub check looks in your DNS provider

Example
Creating the blog.jaredwilton.tech repo was done just for this post. If you want to see a working example with the same theme and GitHub action’s setup check out my blog’s main repo here.
More of my stuff
If you liked this post and want to check out my other work, consider connecting with me on LinkedIn, checking out my GitHub or Buying Me A Beer